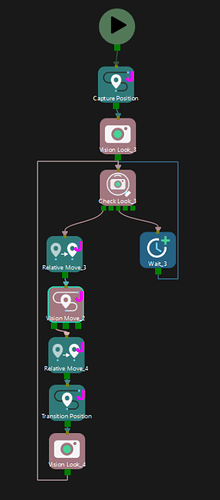
In scenarios involving the use of ETH, as the camera is not installed on the robot itself, the camera can capture images and execute the Mech-Vision project to calculate poses and the Mech-Viz project to plan subsequent path while the robot is in motion. This achieves the goal of saving cycle time.
Main Idea
- Capture images with the camera and execute the Vision project.
- The robot performs picking according to sent waypoints.
- After the robot completes the picking and moves out of the camera’s field of view.
- The camera capturing images in Advance and performs relevant calculations.
- The robot continues with other actions, including placement and returning to the waiting picking position.
- Repeat steps 3 to 5 until all workpieces have been picked.
Under Master-Control Conditions
Viz Project Logic
During the first run, due to the inability to take photos in advance, the logic will be the same as the normal capture logic (“Vision Look_3”). After the first capture is complete, the robot will move out of the camera’s field of view, referred to as the “Transition Position” in the diagram. This position needs to be tested to ensure that the robot and the gripper will not be within the field of view.
Once the robot has moved out of the camera’s field of view, the second capture can be performed (“Vision Look_4”), and the loop for pre-capturing can begin.
Please add additional points as needed.
Standard Interface
The reference robot program for the following picking template is the ABB picking sample program. The documentation link is as follows:
https://docs.mech-mind.net/en/robot-integration/1.7.4/standard-interface-robot/abb-example-program.html
Using Mech-Vision
The picking program logic template is as follows:
- Move the robot to HOME position.
- Move the robot to the image-capturing pose.
- Initialize communication with MM_Init_Socket.
- If parameter recipes are used in the Mech-Vision project, the recipe to be used is set with MM_Switch_Model.
- Run the Mech-Vision project with MM_Start_Vis.
- Wait for 1 second. Under Eye-In-Hand, this WaitTime instruction is required to make sure the robot stays still until image acquisition is completed. Under Eye-To-Hand, this WaitTime instruction can be replaced with MoveL or MoveJ.
- Obtain the vision result from Mech-Vision.
- Check if the returned status code indicates any error. If an error code is returned, the program is stopped.
- Store the obtained vision pose (picking pose) to pickpoint with MM_Get_Pose.
- Move the robot to the picking pose and perform picking.
- Move the robot to an intermediate point between the picking pose and placing pose.
- Move the robot to the set placing pose and perform placing.
- Return the robot to HOME position.
To use pre-capturing, modifications are needed in the corresponding steps:
- Move the robot to the HOME position.
- Move to the camera capture position.
- Initialize communication with MM_Init_Socket.
- If parameter recipes are used in the Mech-Vision project, the recipe to be used is set with MM_Switch_Model.
- Obtain the vision result from Mech-Vision.
- Check if the returned status code indicates any error. If an error code is returned, the program is stopped.
- Store the obtained vision pose (picking pose) to pickpoint with MM_Get_Pose.
- Move the robot to the picking pose and perform picking.
- Move to a safety area between the picking and placing points. When moving to a point outside the camera’s field of view, the camera captures an image, continuing with steps 4-7.
- Move to the designated placing point.
- Repeat steps 8-10 until all workpieces are picked and placed
- Return the robot to HOME position.
Using Mech-Viz
The picking program logic template is as follows:
- Move the robot to HOME position.
- Move the robot to the image-capturing pose.
- Initialize communication with MM_Init_Socket.
- If parameter recipes are used in the Mech-Vision project, the recipe to be used is set with MM_Switch_Model.
- Run the Mech-Viz project with MM_Start_Viz.
- Obtain the planned path from Mech-Viz.
- Check if the returned status code indicates any error. If an error code is returned, the program is stopped.
- Store obtained waypoint poses in the planned path to P{} with a FOR loop.
- Move the robot along the planned path with a FOR loop and perform picking.
- Move the robot to an intermediate point between the picking pose and placing pose.
- Move the robot to the set placing pose and perform placing.
- Return the robot to HOME position.
To use pre-capturing, modifications are needed in the corresponding steps:
- Move the robot to HOME position.
- Move the robot to the image-capturing pose.
- Initialize communication with MM_Init_Socket.
- If parameter recipes are used in the Mech-Vision project, the recipe to be used is set with MM_Switch_Model.
- Run the Mech-Viz project with MM_Start_Viz.
- Obtain the planned path from Mech-Viz.
- Check if the returned status code indicates any error. If an error code is returned, the program is stopped.
- Store obtained waypoint poses in the planned path to P{} with a FOR loop.
- Move the robot along the planned path with a FOR loop and perform picking. (using the positions from P{}).
- Move to the intermediate area between the pick and place points. When moving to a point outside the camera’s field of view, the camera captures an image. Use a loop to save the poses acquired to P2{}(steps 4-7).
- Place the object at the designated place point (using the positions from P{}).
- Repeat steps 9-11, alternating between reading positions from P{} and P2{}, until all workpieces are picked and placed.
- Return the robot to HOME position.

