Scenario Consideration
In the case of EIH, when the robot reaches the photo position and triggers the photo, the general logic of the software is that the robot must wait until the Vision project has finished running and has an output before it can leave;
However, for the Vision project, it can actually be divided into two parts: 1. Camera takes pictures (the step of Capture images from Camera); 2. Vision Calculate
**Saving cycle time: **Both of these parts will affect the visual cycle time. For a generally complex project, the “Vision Calculate” part may reach 1~3S. This part is completely run by the software, not affected by the location of the camera. In other words, we can let the robot take the picture and get the image with the camera and then leave, which can save the beat of this part; The following takes ABB robots as an example to explain the complete steps of setting this part.
I. Add Notifications in Mech-Vision
Add a notification step according to the following control flow wiring method
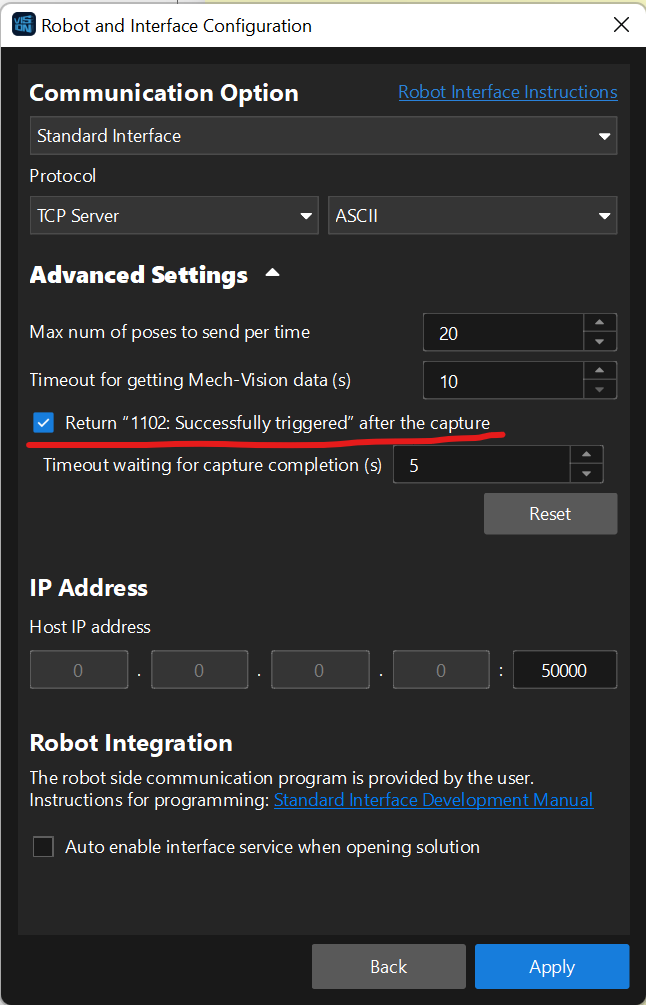
Note:
- “Capture images from Camera” step needs to “Trigger Control Flow Given Output” is selected
- The service name of the “Notify” step is “Standard Interface Notify”, the message can be any number the user wants, such as “1006”.

II. Communication Establishment
- When using the interface to trigger the Vision project to run with the 101 instruction (or use 201 to trigger the Viz project to run), not only will it reply to the general photo-taking instruction of “101,1102”, but it will also reply to the custom notification of “601,1006 (user set message)”
Usage instructions can be found in the Docs documentation:
https://docs.mech-mind.net/zh/robot-integration/latest/standard-interface-development-manual/tcp-ip-socket.html#tcpip-notify

Then directly on the robot or PLC end, make a judgment on the received data, when the received is “601” code, you can control the robot to move away in advance, execute other trajectories or prepare to move to the pickup waiting point in advance
III. Robot Programming
Here it needs to be noted that generally all robots do not have a backend program interface to handle custom notification “601” commands, which need to be additionally programmed by users. The following is a practical case of ABB robot programming:
- Define a numeric variable to receive the 601 command
VAR num CustomNotify:=0;
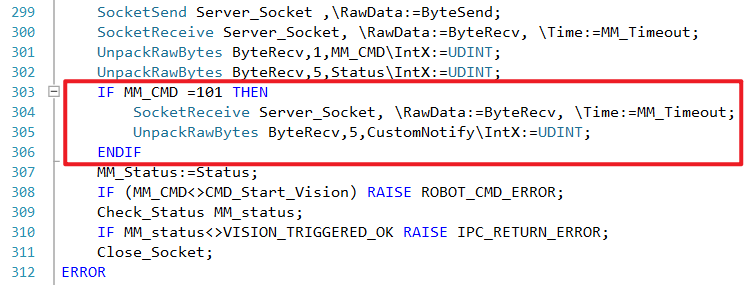
- In the background program “MM_Start_Vis” that triggers the vision project, add additional custom notification program reception commands, here it is implemented with “IF”; since after the “101” command is received, the camera will send a notification message to the robot after taking a photo and triggering the control flow, so after “101” is received, there is a certain delay time, note that the program needs to wait for a period of time, in this piece of code is “\Time:=MM_Timeout”, the data corresponding to the variable “MM_Timeout” is a specific time
    IF MM_CMD =101 THEN
        SocketReceive Server_Socket, \RawData:=ByteRecv, \Time:=MM_Timeout; #Receive socket data
        UnpackRawBytes ByteRecv,5,CustomNotify\IntX:=UDINT;      #Assign the 5th bit of data to CustomNotify
    ENDIF
Add position as follows, in the “MM_Start_Vis” routine, after getting the first “101,1102” message, get another “601,1006” message
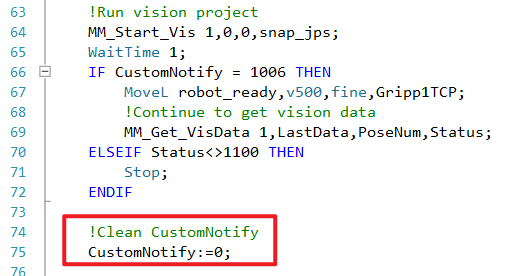
- Add IF judgment in the robot foreground program, when “CustomNotify” equals the message value set in the Vision project, at this time the camera has finished taking the picture, you can execute the “robot_ready” command to move the robot in advance
IF CustomNotify = 1006 THEN
        MoveL robot_ready,v500,fine,Gripp1TCP;
Add position as follows, after “MM_Start_Vis” triggers the vision project to end the photo, execute the necessary robot actions, then use “MM_Get_VisData” to get the vision project vision result

- Note that before triggering the vision project next time, you need to refresh and assign other values to “CustomNotify”, usually reset to 0; avoid the result of the previous time affecting the result of this time
CustomNotify:=0;
Add position as follows, after the single vision result, before triggering the vision project to detect the notification next time.
IV. Conclusion
The above represents the practical application skills of the EIH method. When it is necessary to speed up the tempo, we need to formulate plans and edit programs based on the specific robot brand, following the above approach.