Preface
In manufacturing plants where robots operate, illumination primarily comes from natural light, artificial lighting, or a combination of both. In most cases, shading involves adjusting the factory curtains and modifying or turning off existing lights to meet the operational requirements of 3D cameras. This post categorizes situations that require shading into three main types based on factors such as lighting methods and workstation layouts. These three categories are also frequently encountered during project implementation.
Skylight strips on factory roofs
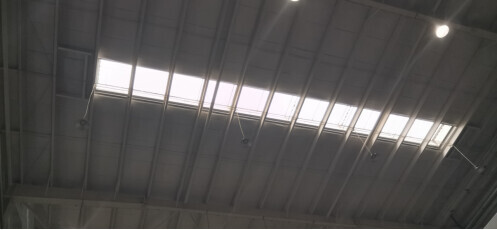
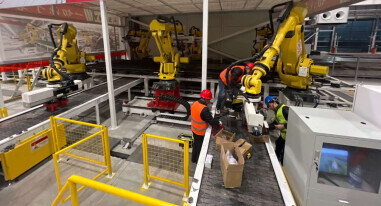
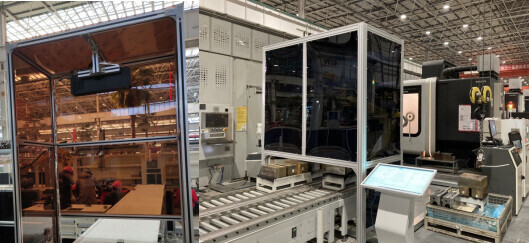
This scenario is commonly found in the assembly and machining workshops or factory buildings in the construction machinery sector. These areas are naturally lit during the daytime and supplemented with overhead lights during the night or on overcast days. If the operation continues 24 hours a day, a distinction of lighting between day and night shifts is also necessary. The following image illustrates the daylighting effect in the steel plate sorting area of a construction machinery factory:
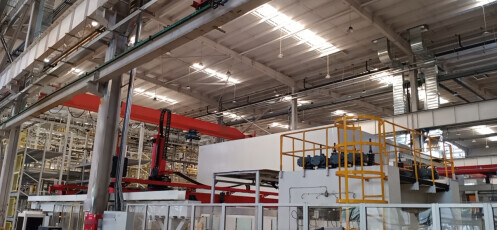
The daylighting effect when auxiliary lighting is turned on is shown in the image below:
Single-point shading
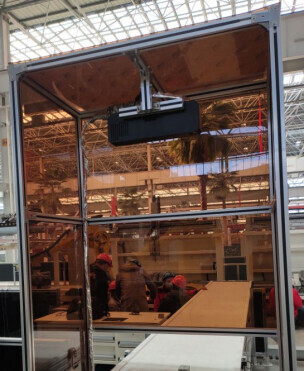
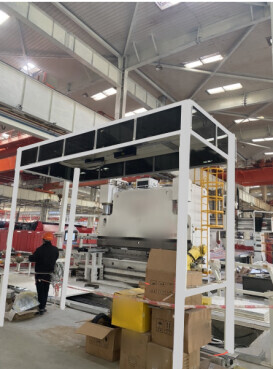
- Scenario 1: When capturing photos with a single camera at a fixed recognition position, prioritize blocking the top light source. If there are high-light reflective components, also shield the oblique light from adjacent light sources at the top of the workstation.
- Key points for shading: For single-point shading, opt for a semi-transparent acrylic panel as the shading material. The support material can be chosen based on the shaded area: using profiles for assembly or employing carbon steel for welding. Implementation examples are shown in images below:
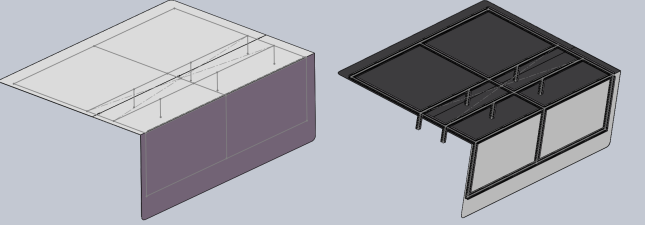
Shading on four sides:
Shading on the top:
Multi-point shading
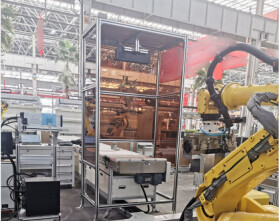
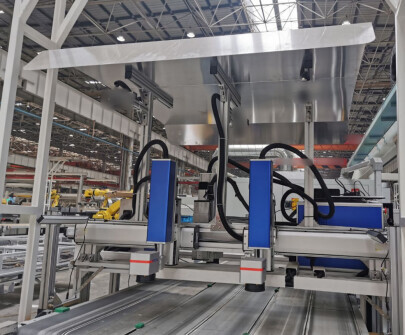
- Scenario 2: Six-axis robotic workstation with multiple camera capture positions, or a single camera’s capturing with sliding and swinging. The shading area should cover all recognition points, including the workstation’s corners affected by oblique light rays.
- Key points for shading: For multi-point shading, semi-transparent acrylic sheets or lightweight fire-resistant fabric can be chosen as shading materials, with a preference for carbon steel welding as supporting material to achieve a larger shading area. Implementation examples are shown in images below:
Workstation with more than one camera:
Single-camera workstation (capturing while sliding):
All-point shading
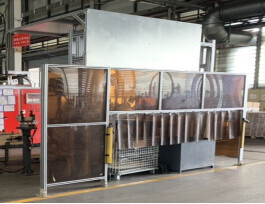
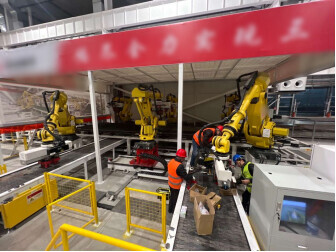
- Scenario 3: A gantry robot workstation mounted with a single camera captures images from multiple positions. Shading should cover all designated areas for recognition. If there are highly reflective workpieces, it is necessary to also shade oblique light.
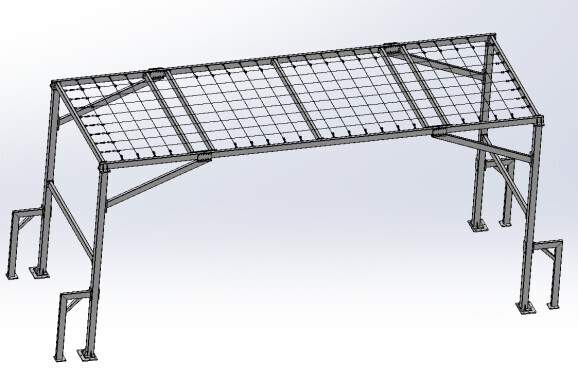
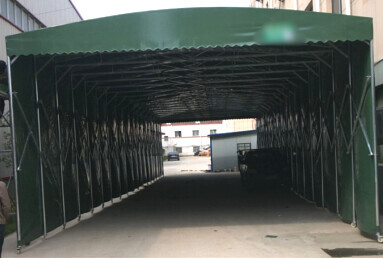
- Key points for shading: When implementing all-point shading, it is not permissible to set up shading structures supported by pillars within the gantry robot’s operational zone. Therefore, options like large-span gantries, overhead canopies, or single-pillar cantilevered canopies can be considered for shading solutions. These solutions need to balance the requirement for shading without impeding the movement of the gantry robot. Lightweight fire-resistant fabric materials are preferred for shading, and the support framework can be constructed by welding carbon steel on-site or using prefabricated gantries. Implementation examples are shown in images below.
All-point shading:
All-point top shading:
- (1) Technical requirements:
- The support structure should be designed after comprehensive consideration of on-site equipment’s layout and the surrounding environment.
- The shading framework should be sturdy and aesthetically pleasing.
- The whole shading equipment should have a small footprint and not interfere with nearby equipment and safety barriers.
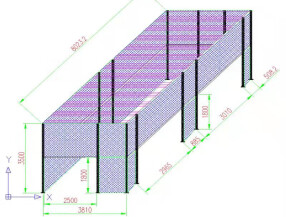
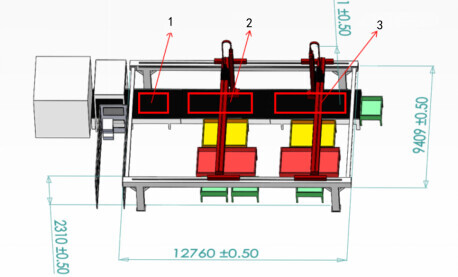
- The shading equipment should not hinder the loading and unloading in the aisle or the overhead crane hoisting, as shown in the example image below (1. Waiting area | 2. Camera one capturing area | 3. Camera two capturing area):
- (2) Surrounding shading material:
- For conventional projects, semi-transparent acrylic panels are commonly used. By connecting corner fittings through prefabricated holes, these panels can be securely installed onto the support framework. In cases with additional constraints, fully opaque fabric curtains can be chosen, as illustrated in the image below (Note: Currently, fabric colors should be chosen according to certain requirements):
- Taking the example of using fabric curtains to enclose, the fixation method can utilize the basic installation approach for fabric curtains: securing aluminum curtain tracks onto prepared brackets. The curtains are crafted with a relatively small yet normal ratio of folds, ensuring an elegant appearance without being surplus. This approach also facilitates the easy removal and installation of fabric curtains, aiding future cleaning and replacement. Additionally, when paired with electric drive mechanisms, automated control can be achieved.
- For conventional projects, semi-transparent acrylic panels are commonly used. By connecting corner fittings through prefabricated holes, these panels can be securely installed onto the support framework. In cases with additional constraints, fully opaque fabric curtains can be chosen, as illustrated in the image below (Note: Currently, fabric colors should be chosen according to certain requirements):
- (3) Top shading material:
- Since the framework’s span is large and supporting columns are not allowed within that span, there are strict limitations on the weight of the top shading material. In this case, fireproof fabric, a cost-effective option, can be used for shading on the top surface. However, this material requires a support structure to prevent material collapse.
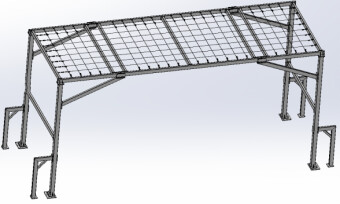
- (4) Recommended framework:
- The main frame structure is constructed using 80 mm * 80 mm galvanized square pipes.
- Connections between main structural components are made using 50 mm * 50 mm galvanized square pipes, which also serve as support frames for shading materials.
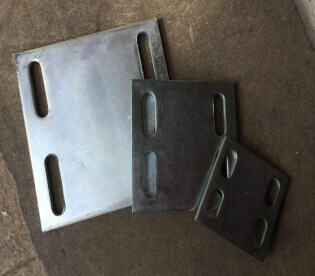
- Ground connection components are made from 200 mm * 200 mm galvanized steel plates, secured to the ground through either embedded or anchor bolts. The components are depicted in the image below:
- Embedded components are fixed onto the concrete ground using steel expansion bolts, followed by welding square pipes onto these embedded components.
- Galvanized square pipes and galvanized steel plate embedded components will undergo a paint spray treatment to prevent rusting.
Sunlight penetrates factory side windows
This scenario is commonly observed in factory buildings with a north-south axis layout. The east and west sides of the building are exposed to slanting sunlight during the morning and afternoon, respectively. Due to factors such as seasonal changes, the intensity of sunlight also exhibits cyclical variations, especially during the summer and fall seasons. On the east side of the factory building, sunlight exposure occurs during the morning; on the west side, it occurs during the afternoon. In the following sections, we will explore two real-life cases to illustrate how shading solutions can be implemented in this scenario.
Large-scale glass curtain wall
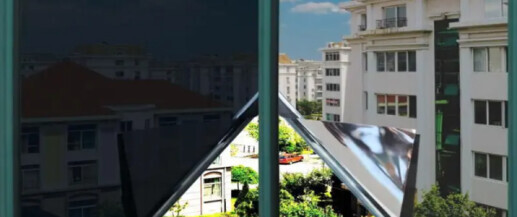
The eastern side of a mechanical processing factory built along the north-south axis features a large-scale glass curtain wall, as depicted in the image below. This area is most prone to sunlight exposure during the morning hours.
Solution: To address the issue of excessive sunlight, a solution involves applying film to the glass curtain wall. Typically, a semi-transparent film is utilized for this purpose, and on some sites, a film with 75% opacity is employed. The choice of specific film transparency can be determined based on the actual lighting conditions at the project site and the requirements of the factory. For precise film models, contact the personnel through the store’s support for more information. The image below illustrates a comparison between two materials with varying degrees of light transmittance:
High-level daylighting windows
The image below depicts the western side of a component machining workshop, where the impact of afternoon sunlight is particularly severe.
Sunlight shading approach overview
In the two aforementioned scenarios, a solution for mitigating the sunlight impact needs to be tailored to the client’s specific circumstances. If the client does not agree to obstruct all windows, a partial shading approach is required, which is equally applicable to scenarios where direct sunlight penetrates from three sides on-site, coupled with strong LED illumination from the top during the night. Such scenarios are commonly encountered in semi-open workstations adjacent to glass curtain walls in large factories.
- The shading design primarily encompasses the following aspects:
- Effectively block most of the sunlight and artificial lighting to diminish direct or slanted light on workpieces, thereby establishing a favorable lighting environment for 3D cameras’ operation.
- The chosen shading material should have an elegant appearance that suits the site’s style and be semi-transparent to meet the client’s requirements for production observation and visitation needs.
Material choice
-
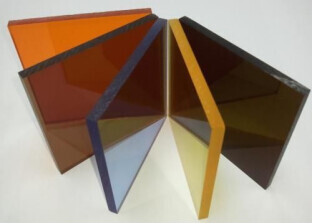
(1) Shading part: Utilizing semi-transparent, tea-colored acrylic panels, as illustrated in the image below:
-
(2) Framework part: Selecting European standard aluminum materials, the connections between these materials are made using built-in connectors, and the slots are sealed with black sealing strips. The aluminum framework is depicted in the image below:

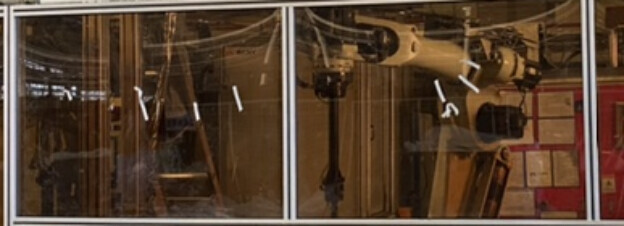
Roof lighting in workshops
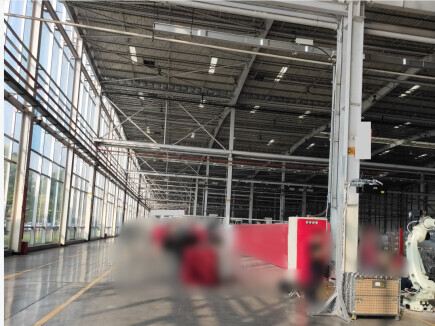
This scenario frequently arises in cleanrooms and precision machining assembly workshops, such as the defect inspection workshop in the electronic industry, and in the mechanical industry for tasks like engine assembly, motor assembly, and bearing assembly. In these workshops, roof lighting is used exclusively. Different shading solutions are provided based on the form and density of the light sources. The roof lighting arrangement for a specific workshop is depicted in the image below:

Partial shading layout
Shading requirements
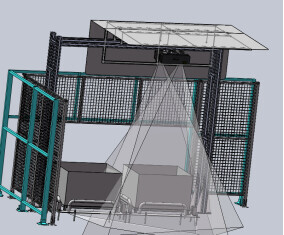
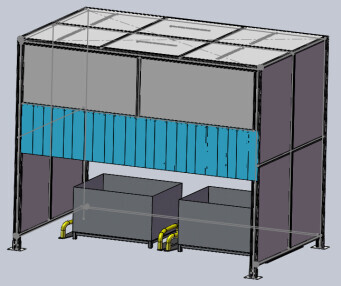
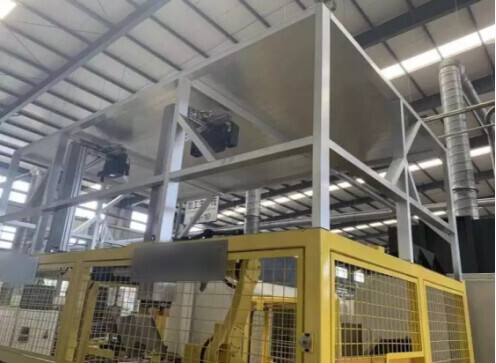
Continuous lighting overhead at the workshop interferes with the camera’s operation, so shading is necessary. Illustrated in the image below is a targeted light shading solution: The shading apparatus is installed on a gantry camera mount, capable of simultaneously obstructing the light from both the top and the front of the camera, thus preventing the adverse effects of direct and oblique light exposure:
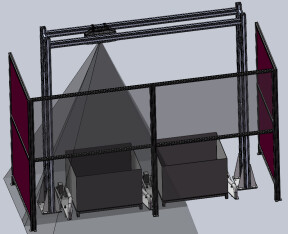
Furthermore, when there is oblique light, a solution involving shading on all sides can also be utilized. This maintains the daylighting effect from the top strip, eliminating the need for additional supplementary lights, as shown in the image below:
Introduction to shading solution
- (1) Shading framework materials:
- The support structure is constructed using 40 x 40 aluminum materials.
- The top panel can be made of anodized aluminum plate, which is bent on both sides, with a thickness of 3 mm.
- The side shading can be achieved using semi-transparent brown acrylic panels.
- (2) Technical requirements:
- The design principles for the shading device mounted on the camera bracket: lighter weight is preferable; avoid layouts with large spans and areas; consider the on-site ventilation conditions comprehensively to prevent camera bracket vibrations due to wind, which could affect camera calibration parameters.
- Aluminum plate solution: Comprised of two aluminum plates, they are assembled with a high degree of overlap to prevent light leakage. Besides, the rectangular aluminum plate is positioned below, and the L-shaped aluminum plate is placed on top. Furthermore, for the sake of installation and transportation convenience, it is also feasible to cut oversized aluminum plates into smaller pieces for installation, as long as the joints ensure no light leakage. The three-dimensional schematic model of the top and sides is shown in the image below:
Small area shading layout
Application overview
This shading solution is also suitable for scenarios where one side of the site is exposed to direct sunlight, or where strong LED lights shine from the top at night. Typically, such workshops are situated in areas with a more compact layout.
- Objective of the shading design:
- Block most of the sunlight and artificial lighting, prevent direct exposure of the workpieces, and create a favorable lighting environment for 3D cameras to operate.
- The shading arrangement must meet the requirements of the on-site layout, especially in cases where there are numerous pieces of equipment and the layout is tightly packed.
Material choice
- (1) Shading part:
Use semi-transparent acrylic panels in shades of brown or black, and the choice of color primarily depends on the layout of the work site, aiming to maintain consistency and a visually appealing appearance. Refer to the image below:
- (2) Framework part:
Selecting European standard aluminum materials, the connections between these materials are made using built-in connectors, and the slots are sealed with black sealing strips. The aluminum framework is depicted in the image below:
- (3) Loading and unloading entries/exits:
Semi-transparent soft curtains will be installed to facilitate loading and unloading, whether by personnel or equipment.
Technical requirements
- (1) The side shading framework integrates with the workstation safety enclosure, serving as a barrier.
- (2) Considering the overall layout, determine the foundation bolt-hole positions of the columns to avoid spatial constraints on the workstations.
- (3) Acrylic panels are embedded within the slots of the aluminum materials, and the top shading panel’s size is determined based on requirements.
- (4) The chosen shading material should have an elegant appearance that suits the site’s style and be semi-transparent to meet the client’s requirements for production observation and visitation needs.
Other recommendations about shading
When designing shading solutions, two main factors should be considered: first, shading materials, as appropriate selections are necessary to meet the recognition requirements of the camera; second, framework structures that support the shading materials. Only after determining factors such as the shading material, scope of shading, workstation layout, and other comprehensive factors, can the suitable framework materials and structural layout be finalized.
Shading materials
Different application scenarios have varying demands for shading materials. Apart from meeting shading effectiveness, additional requirements such as low cost, aesthetic appeal, and easy installation should also be fulfilled. Therefore, these issues should be thoroughly discussed right from the design stage.
Semi-transparent acrylic panel
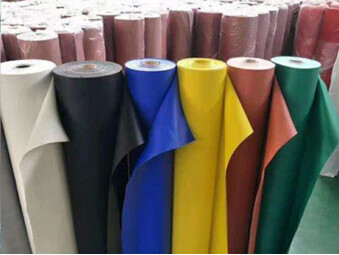
Semi-transparent acrylic panels provide a certain level of shading effect and are mainly suitable for scenarios like smaller workstations’ tops and sides. Due to their lightweight nature, these panels can be combined with camera mounts or independently used with aluminum materials to swiftly form assembly solutions. These panels offer convenience in installation and aesthetics. Besides, they have different materials of various colors and levels of transparency, yielding distinct shading effects, as shown in the image below. A drawback, however, is their relatively weaker structural stability, making them susceptible to damage.
A three-sided shading solution coordinated with a camera mount is depicted in the image below:
Metal plates
Metal plates are commonly made from materials such as steel, aluminum, etc. They exhibit excellent shaping results and provide effective shading properties. Known for their strong stability and high durability, they also offer protection for cameras. They are particularly suitable for situations where there is overhead crane operation in photography workstations. Given their substantial weight, the framework of steel structures for support should be considered when designing. To enhance aesthetics, the plates can be painted with the same color as the workstation equipment, creating a unified appearance. The shading solution using metal plates is illustrated in the image below:
Fireproof canvas
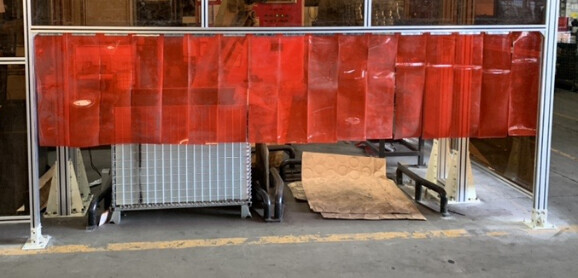
Fireproof canvas is characterized by its lightweight, affordability, and easy installation. Depending on the factory environment, different materials and colors can be chosen. It effectively shades light and is ideal for scenarios requiring extensive shading, such as covering a row of four to five camera recognition workstations as a whole. This shading method comes with low costs and is often paired with modular steel structure design schemes, ensuring convenient and economical installation. The materials used are depicted in the image below. However, it is worth noting that the downside is its relatively weak structural stability, making it susceptible to damage.
The shading solution for multiple workstations is presented in the following image:
Semi-transparent soft curtains
Semi-transparent soft curtains are commonly used in workstations where loading and unloading are frequent. They are placed at the entries and exits for materials, facilitating the loading and unloading processes of AGVs or forklifts. This shading solution offers significant flexibility but has the drawback of being prone to deformation and damage. Moreover, its flexibility is greatly affected by environmental temperatures. See this image of semi-transparent soft curtains below:
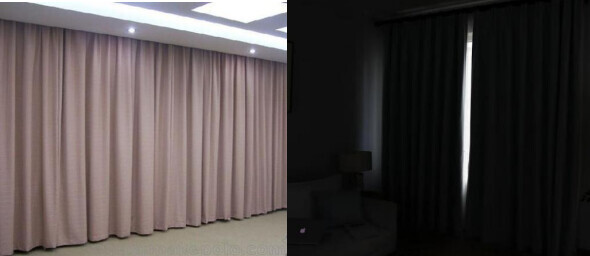
Regular curtains
Without compromising the normal daylighting of the factory, it is possible to obstruct windows in areas where sunlight has a significant impact. Typically, the duration of shading varies with the varying angle of sunlight incidence, exhibiting cyclic changes. When paired with motorized tracks, intelligent control can be achieved. The shading effect of such curtains is shown in the image below:

Shading film
The solution involving shading film offers strong convenience. It is usually applied to windows that have a significant impact on photography workstations or to skylight tiles on the ceiling. This shading approach does affect the ambient light around, so it is important to consult with the end-users to determine if the effect is acceptable. For instance, implementing this approach in large-scale factory buildings with extensive and high skylight tile areas might pose some challenges. Shading film is illustrated below:
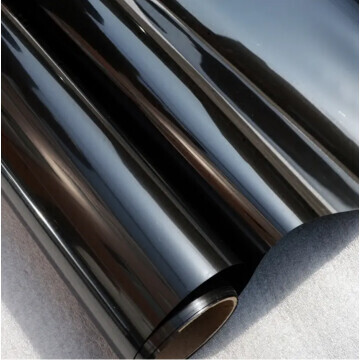
Table 4.1: Comparison of different shading materials
| Shading material | Aesthetics | Fireproof | Weight | Installation difficulty |
|---|---|---|---|---|
| Fireproof canvas | Neat installation, pleasing appearance | Yes | Light | Convenient and quick on-site installation |
| Acrylic panel | Overall appealing design | No | Heavy, contributing to overall weight of the shading structure | The shading framework requires prefabricated installation holes for mounting acrylic panel, posing challenges for on-site installation. |
| Thin steel plate | Steel plates are prone to warping and bulging and are painted to match workstation colors. | Surface paint is not fireproof | Heavy, contributing to overall weight of the shading structure | The shading framework necessitates many anchor points for steel plate installation, resulting in a complex on-site installation process. |
Framework structures
Aluminum material structure
- Advantages: Flexible design; Convenient installation; Standardized components.
- Disadvantages: Limited stability; Relatively higher cost.

Integrated steel structure
- Advantages: High stability; Lower cost; Camera protection; Large shading area; Strong load-bearing capacity.
- Disadvantages: On-site welding required; Lower flexibility.
Modular steel structure
- Advantages: Modular installation; Large spans and shading area; Strong stability.
- Disadvantages: Longer design, machining, and installation cycles; Higher cost.
Mobile steel structure
- Advantages: Low cost; Large spans and shading area; High flexibility.
- Disadvantages: Poor stability; Lower aesthetics; Longer customization period.
- This is helpful.
- This does not solve my issue.